Showing posts with label Marine Aquarium Setup. Show all posts

The important of temperature of a saltwater tank

Sunday, August 9, 2009

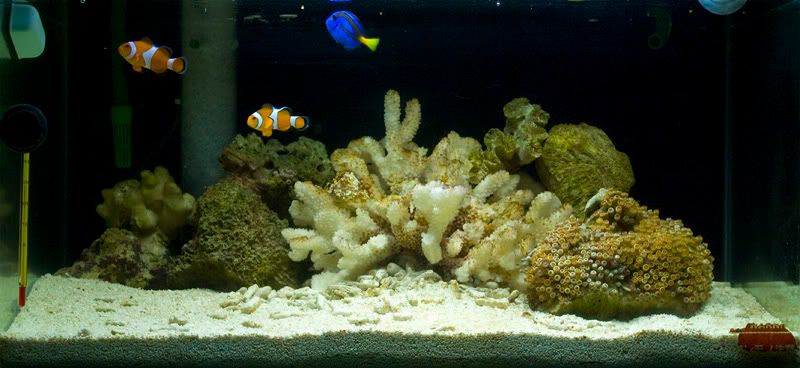
For saltwater organism to have a comfortable living environment, especially in a confine area such as a home aquarium, it is very important that the temperature of a saltwater tank be maintain as consistence as possible.

I’m living in a tropical country, with room temperature sometime goes to as high as 33 degree C during a hot sunny day and may go down to as low as 25 degree C during the night. If the saltwater aquarium temperature is not maintain at a constant degree, most of the living organism, the fishes, the corals will not able to survive such dramatic changes. Therefore some king of cooling mechanism is required.

There are basically 3 ways to cool down a saltwater tank.

  1. Use a cooling fan to cool the water surface of the tank.
  2. Use a aquarium chiller to chill down the water.
  3. Bring down the room temperature with a air conditioning unit.

Option 1 is the cheapest to setup but lack of consistency and efficiency. The amount of temperature that the cooling fans can bring down is about 2-3 degree C.

Option 2 and 3 will be more effective but expensive to setup and maintain. It is independence of any factor. Just set your desire temperature and the system will cool it to perfection. All you need to do is to pay for the high electricity bill.

After observing my setup and its environment, I use option 1 instate. Reason was room temperature is at about 30 degree C, so with the fan on, it brings down the water temperature to about 27-28 degree C. This is the desire temperature for my tank.

2nd reason is cheap to setup and low in maintenance cost. I choose to use two PC 12VDC fans for this purpose.

The downside of this system is that the saltwater aquarium water evaporates at a very high rate. I’m loosing about 5-8mm of water per day. If left unattended, I lost about 20-30mm in a week. When this happen, the salinity of the saltwater will increase and if it goes too high, it will create some unfavorable condition in the aquarium. Fishes and corals may get stress and sometime even death.

In order to overcome this problem, I decided to work in 2 areas.
  1. Use a temperature controlled fans – The cooling fans will only runs when the temperature is above 28 degree C but will stop when water temperature drops to less then 27 degree C. This helps reduce water evaporation.
  2. Introduce an automatic water top up system. This system will constantly top up the lost water due to evaporation, water salinity will be maintained.
I will now work into this 2 area with some DIY gadgets.

My 1st Marine Aquarium.

Monday, July 27, 2009


After almost 1 months, my tank finally coming to shape.

Here's how the final results look like. It looks a bit bare, but as time comes I'll slowly add in more species, especially on corals.

I've also included few DIY gadgets, like the protein skimmer at the back, a 36W PL-L lighting, which I've mod from a 20w, 2 feet bigboy light hood and a 12V DC cooling fan.

More DIY gadgets coming, include a auto water top up and temperature control cooling fans.

Setting up a marine aqurium - Day 4

Friday, June 19, 2009


Finally, after waiting for almost 3weeks, here comes the day to move in the resident. You may ask why wait so long ?

This is simply because I'm allowing the tank to get cycled. What this means is that once the tank is running with live rock and filter working, we need to give some time for the good bacteria to grow.

This bacteria is useful in removing ammonia and fish wastes. Without this bacteria, new fishes when added will cause an ammonia spike and hence causes casualty.

So after 3 weeks, I do a water parameter test.
  1. Water temperature, it was maintain in between 28C - 30C. This is good.
  2. PH test, Water ph is maintain at 8.3-8.5, that's good as marine fishes love such PH level.
  3. Ammonia test. I do not have a ammonia tester, so I tested for nitrite, (NO) which is a sub product of Ammonia. The reading turns out to be good, which is 0 ppm
  4. Salinity (water saltiness). Salinity should be around 1.02 - 1.025. Using a hydrometer, the salinity measured was about 1.02. tha's good also but I added abit more salt to bring up the salinity, just in case if I overfill the tank with freshwater, it does not hurt the salinity.
It looks like the tank is all ready to go.

Here's the first resident, 2 orange clown fish. Now don't be too excited to add all the fishes into the tank, cause we are not sure whether the tank is really ready for fishes. This 2 Nemo will be the guinea pig. If they survive, that means the tank is all ready.

Setting up a marine aqurium - Day 3

Friday, June 5, 2009

Day 3 of the setup is pretty simple. All that need to do is to put in the water filter, a canister type I'm using. Fill the filter with necessary filter media for mechanical and bio filtration.


Bring up the water salinity by adding sea salt. Let the water circulate for a while so that the salinity is even. Once the tank water's salinity is stable, add in live rock and let the tank cycle. This will take a few weeks, usually 2-3 weeks to allow good bacteria to grown.

This bacteria is needed to combat ammonia, and NO2. Once the tank is fully cycle with 0ppm of ammonia, then is time to add in the live stock.

So for the time being, I'll just have to wait.

The cannister filter placed on the bottom of the tank

The final setup. May need to add more live rock

If you have missed Day 1 and Day 2 of the setup, click the following link

Day 1 of the setup

Day 2 of the setup

Setting up a marine aqurium - Day 2

Tuesday, June 2, 2009

Day 2 of the setup.

Today I'm fixing the cooling fans follow by the lighting.

The cooling fans was a DIY type, therefore it took me sometime to design and modify two tank's partition holder into a fan holder. Once the physical fixing is done, I have to work on the electrical wiring , which consist of a 12VDC adapter.

When the fans are done, i just put on a 2 footer lighting hood that I bought couple of years ago. It was brand new, just waiting to use it.

Once all this is done, the tank is fill up with fresh water and I leave it running for the moment.

Next step will be adding sea salt, live rocks and a canister filter.

Click here to proceed to Day 3 of the setup is ready.

If you have missed what had happen on Day 1, Click here to read on

Setting up a marine aqurium - Day 1

Saturday, May 9, 2009

I have decided to used my existing 2 feet tank and convert it into a Nemo Tank (Clown Fish).

Clown Fish aka Nemo belong to the salt water species, therefore the setting of the tank will have to use the marine technique instate if fresh water technique.

As I'm more familiar with fresh water setup, marine setup is a totally new subject to me. Therefore lots of research was made before I start and I got to say, is another new challenge to me.

Here I document the process and I used to setup.
Day 1, 9 May 09
Perform aquascaping (decorate the tank)

This is the beginning stage. Will add live rocks later when the canister filter arrived. At this moment, I’m just using the HOB filter to keep then water running.

Water is still at fresh state, ie no sea salt added yet as I’m expecting to do a few more found of water change, until the water is clear.


Prepared the base with dead coral sand and some fine white sand. Once the gravel is set, I place the dead coal at the center of the tank. The left and right of the tank will be reserved for live rocks.


Fill the tank with fresh water and let the HOB filter run to clear off debris and dirt. Will replace the water a few time until the water become totally clear. Once the water is ready, I will then add sea salt to get the correct salinity.

Day 2 and Day 3 of the setup is ready. Click the following link to read on.

Day 2 of the setup

Day 3 of the setup

 
ss_blog_claim=d8f333be89349411cf7c28d5cb4c3f34